
Amputee rehabilitation moves in stages, not straight lines. Some days the leg feels strong, the socket fits well, and balance clicks. Other days, volume fluctuates, the limb gets sore, or motivation dips. That’s normal. Understanding the stages of amputee rehabilitation and physical therapy progress, Etapas De Rehabilitación De Amputados, helps set expectations, reduce anxiety, and keep momentum steady. Below, they’ll find what typically happens from pre‑prosthetic conditioning through long‑term milestones, with practical tips and therapist‑guided benchmarks. See more insights woven into each stage for real‑world carryover.
Pre-prosthetic conditioning to strengthen residual limb muscles
Pre‑prosthetic rehab begins as soon as the surgical team clears the person to move. The goals are simple: protect the residual limb, build strength and range of motion, manage swelling and pain, and prepare the body, especially the hips and core, for future gait training.
Key priorities in this stage
- Residual limb shaping and edema control: Soft elastic wraps (figure‑8), shrinkers, and proper positioning limit swelling and help shape the limb for a better socket fit later. Consistency matters more than tightness: if toes tingle or the limb turns pale, wrapping is too tight.
- Contracture prevention: After lower‑limb amputation, hip and knee flexion contractures are common. Therapists coach frequent position changes, prone lying (as tolerated) for hip extension, and gentle stretching to keep joints supple.
- Desensitization and scar mobility: Light tapping, texture exposure (e.g., cotton to terry cloth), and scar massage reduce hypersensitivity and improve tissue glide, which can ease socket comfort down the road.
- Strength and balance foundations: Core, gluteal, and hip abductor work stabilize the pelvis. For transtibial amputees, quadriceps and hamstring control supports knee mechanics: for transfemoral, hip extensors and abductors do extra heavy lifting to control the prosthetic knee and prevent Trendelenburg gait.
- Cardiovascular conditioning: Short, frequent sessions on an upper‑body ergometer, seated circuits, or interval breathing keep endurance from dropping, critical because walking with a prosthesis can require more energy.
- Phantom limb and residual limb pain strategies: Education, graded motor imagery, mirror therapy, and consistent skin care combine with medical management to reduce pain and fear.
What good progress looks like
- Incision healing on track: swelling trending down week by week
- Able to maintain full hip and knee extension without pain
- Tolerates shrinker or wrap for most of the day without skin irritation
- Performs core and hip strengthening 3–5 days per week with good form
Common pitfalls include sitting in a recliner for hours (promotes flexion contractures) and skipping daily wrap checks. Early diligence here shortens time to a comfortable prosthetic fit later.
Initial gait training and learning balance with assistive devices
Once wound healing is adequate and the prosthetist/therapist clears weight‑bearing, gait training starts, usually inside parallel bars.
Building balance and confidence
- Static to dynamic: They begin with quiet standing, equal weight bearing, and gentle weight shifts forward/back and side‑to‑side. Then progress to marching in place and reaching outside their base of support.
- Safe stepping: Therapists cue heel‑to‑toe (for transtibial) and pelvic control with even step length. For transfemoral users, early emphasis is on hip extension at terminal stance to drive the prosthetic knee into stable extension.
- Assistive devices: Walkers give the most stability, followed by crutches, then canes. The choice depends on balance, strength, and home environment. Devices are weaned as symmetry and safety improve.
- Fall prevention: Learning how to pivot, turn, and manage carpets, thresholds, and wet floors matters as much as straight‑line walking. They practice safe falling and getting up techniques, too.
Practical home adjustments
- Clear pathways, add grab bars in the bathroom, secure loose rugs, and improve lighting on stairs.
- Keep frequently used items at waist height to reduce bending and loss of balance.
Short, frequent bouts of practice beat occasional long sessions. Expect form to degrade with fatigue, quality over quantity keeps bad habits from sticking.
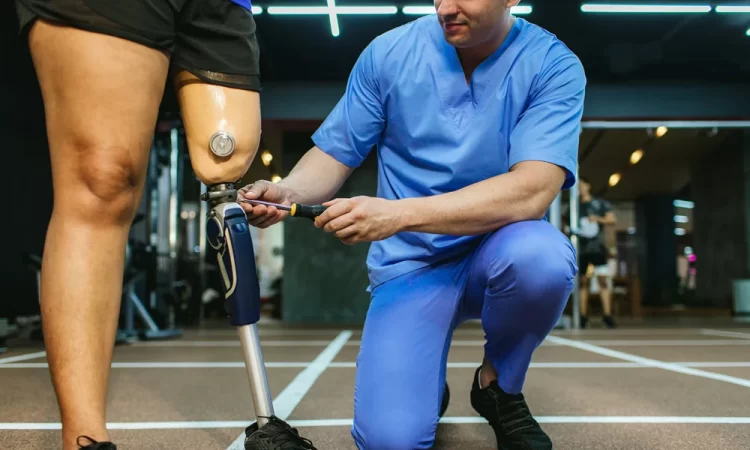
Prosthetic fitting, trial phases, and comfort adjustments
Prosthetic fitting is iterative. Residual limb volume can change weekly early on, which is why test sockets and regular adjustments are the norm.
How the process typically unfolds
- Evaluation and casting/scanning: The prosthetist assesses limb shape, skin integrity, range of motion, and strength: then creates a model for the test socket.
- Test socket (check socket) trial: A clear thermoform socket allows the team to see pressure areas while the person stands and walks. Alignment tweaks (foot position, socket angle) happen here.
- Suspension and component choices: Options include suction, pin/lock liners, or vacuum systems: feet range from flexible keel to energy‑storing carbon: transfemoral knees vary from single‑axis mechanical to microprocessor‑controlled. The selection depends on activity level, goals, and payer coverage.
- Definitive socket: Once comfort and alignment are dialed in and limb volume stabilizes, the definitive socket is fabricated. It’s still adjustable, but the big variables should be settled.
Comfort and skin care essentials
- Wear schedule: Start with brief periods (e.g., 30–60 minutes on, then off to check skin), adding time each day if the skin looks healthy.
- Sock‑ply management: As the limb shrinks during the day, additional sock ply restores fit. A loose socket means piston motion and skin shear: too tight creates pressure and numbness.
- Daily skin checks: Use a mirror to inspect the back and distal end. Red areas that fade within 20–30 minutes are usually okay: persistent redness, blistering, or sharp pain signals a fit issue, call the prosthetist.
It’s better to speak up early than “push through.” The right alignment and interface can transform energy cost and confidence.
Intermediate therapy focusing on endurance and coordination
With an initial prosthesis and basic gait underway, therapy zooms out: longer distances, real‑world terrains, and coordinated movement.
Endurance and efficiency
- Interval walking: Example progression, 3 minutes walk, 1 minute rest x 6: build toward 20–30 continuous minutes. Track perceived exertion and heart rate.
- Terrain training: Ramps, curbs, grass, gravel, and uneven sidewalks challenge proprioception and ankle/foot mechanics. They practice step‑to and step‑through strategies on stairs based on comfort and knee control.
- Energy management: Transfemoral walking can cost significantly more energy than able‑bodied gait: pacing, breath control, and appropriate componentry help offset the gap.
Coordination and agility
- Lateral stepping, tandem walking, and figure‑8s sharpen balance reactions.
- Dual‑tasking, walking while counting backward, carrying a light bag, or responding to questions, prepares for daily distractions.
- Strength circuits: Hip abduction, extension, and core anti‑rotation drills: sit‑to‑stands: step‑ups: resisted walking with bands. Two to three nonconsecutive days per week builds durable strength without overtraining.
Return‑to‑work or sport goals enter here: kneeling to garden, getting in/out of a truck, recreational cycling, or community walks. Therapy plans become highly personalized.
Emotional adaptation during long-term recovery milestones
Physical progress and emotional adaptation feed each other. Most people cycle through grief, frustration, acceptance, and pride, sometimes in the same week. Naming this is powerful.
What helps psychologically
- Realistic, staged goals: Instead of “walk perfectly,” aim for “walk 10 minutes outdoors without stopping.” Small wins stack.
- Peer support: Speaking with other amputees, even a single, honest conversation, normalizes setbacks and shares hacks you won’t find in manuals.
- Counseling and mental health care: Anxiety, depression, or trauma responses aren’t moral failures: they’re common and treatable. Therapists can integrate cognitive strategies into physical rehab.
- Identity and body image: Reclaiming favorite activities (cooking a family meal, finishing a 1‑mile loop, returning to a craft) anchors identity beyond the limb.
Milestones worth celebrating include the first community outing, first full workday, first long weekend trip, or the moment the prosthesis feels like part of the body rather than equipment. These are core “stages of amputee rehabilitation”, the lived Etapas De Rehabilitación De Amputados.
Burnout is real in long recoveries. Planned deload weeks, social time, and hobbies that don’t revolve around rehab protect motivation.


